FITTING INSTRUCTIONS
R50 R52 R53 FITTING INSTRUCTIONS
(2001 - 2006 & cabriolet 2005 - 2008)
These fitting instructions are guidelines only. We can not be held responsible for any mistakes or inaccuracies forthwith. There are variations on universal wiring kits.
YOUR KIT WITH WIRING SHOULD ALWAYS BE FIT BY A QUALIFED MECHANIC OR VEHICLE ELECTRICIAN.
Measure an equal distance from either side of the front grille, pick a spot where you want the lights go and look effective.
Use self tapping screws to secure the brackets in place, the upper screw on the bracket will attach to the double skin on the inside of the bonnet (DO NOT GO THROUGH THE BONNET!) put electricians tape under the screws to stop the self tapping screw slipping around.
Attach the lights to the brackets.
When cutting all the wires to length place the relay in the position that you will keep it and then measure the wire length from there. Some people place it behind the headlight.
Connect a wire from terminal 30 to the positive of your battery use an inline fuse anywhere between this, - 15AMP Minimum.
Connect a wire from terminal 86 to the positive wire on your high beam, this will switch the lights on when you put your high beam on. Fit an inline switch so you can turn them off from the inside of your car (you need to splice in the wire on your high beam).
Ground the relay from terminal 85, the best ground on the car is the main battery?s ground.
Connect 2 wires from terminal 87 using one (1) spade connector, one to each light ( if you use one wire and fit both lights to it then one of the lights will come on first then the second! )
Tidy all the wires up and secure the relay somewhere, such as placing it it behind the headlight.
BMW DO NOT FIT AN INLINE SWITCH WITH THESE LIGHTS AS THEY COME ON WITH YOUR HIGH BEAM WHEN IN POOR VISIBILITY. HOWEVER SOME PEOPLE LIKE TO HAVE THEM ON WHEN STATIONARY SO YOU NEED TO HAVE AN INLINE SWITCH TO DO THIS.
You do not need BMW to code in any lights.
IF YOUR LAMPS FAIL TO LIGHT UP THEN CHECK THE EARTHING - PARTICULARLY IF YOU HAVE POWDER COATED BRACKETS IN THE SET UP.
FOR XENON LAMPS YOU ARE REQUIRED TO FIT THE GREEN WIRE TO THE MAIN BEAM.
DISCLAIMER - WE HOLD NO RESPONSIBILITY FOR YOU CARRYING OUT THIS WORK - THESE ARE EXAMPLE GUIDELINES ONLY - YOU SHOULD ALWAYS USE A QUALIFIED MECHANIC OR VEHICLE ELECTRICIAN. YOU MAY HAVE SLIGHTLY DIFFERENT WIRE COLOURS AND KIT THEREFORE NEED TO ADJUST THE FITTING AS REQUIRED.
As mentioned earlier there are many variations on fitting - you can google 'wipac lights fitting instructions' you will find lots of advice in many mini specialist forums
IMPORTANT!!! WHEN FITTING R50 R52 R53 BRACKETS - USE SELF TAPPING SCREWS (OR BOLTS IF PREFERRED).
PLUS MAKE SURE YOU DO NOT PIERCE THE OUTER SKIN WITH THE TOP SINGLE SCREW / BOLT!
WIRING INSTRUCTIONS
IF YOU HAVE A MUTI COLOURED WIRING KIT (GRAYSTON etc) SEE THESE WIRING BASIC INSTRUCTIONS..
Connect red wire to positive terminal/jumpstart terminal.
Connect Blue wires to Spot lamps
Connect Green wire to Yellow/Blue wire on back of headlamp (main beam wire)
Connect black wire to a headlamp mounting bolt.
Harness Wiring
Note: This is a general wiring diagram for automotive applications. Use as reference only. Your lamp kit harness may have different wire colours.
Locate the low beam or high beam light lead on one headlamp by using a circuit tester. Use the following procedure: For Fog Lights: Turn on the low beam headlamps. Connect the end of the circuit tester to ground (-) and use the tester to locate the headlamp low beam lead. Turn off the ignition and the headlamps. Disconnect the battery. For Driving Lights: Turn on the high beam headlamps. Connect the end of the circuit tester to ground (-) and use the tester to locate the headlamp high beam lead. Turn off the ignition and the headlamps. Disconnect the battery.
Scotch-lock the bare end of the GREEN wire to the low or high beam lead. Connect the other end of the GREEN wire to the green switch wire terminal.
Attach the BLACK wires from the lamps to the vehicle ground.
Position the relay upright on the battery side of the engine compartment in an area that is not exposed to water spray, excessive heat or moving parts. Make sure the relay is mounted close enough to the battery so the RED power lead will easily reach the positive (+) terminal of the battery.
Connect the RED wire to the positive (+) battery terminal and to the relay terminal labelled 30.
Route the RED / WHITE wires from the lamps to the relay. Connect the RED / WHITE wire to the lamp terminals and to the relay terminal labelled 87.
Connect one BLACK lead to the vehicle ground and to the relay terminal labelled 86.
Connect the YELLOW wire to the yellow switch wire terminal and to the relay terminal labelled 85.
Test the operation of the lamps as follows: Re-connect the battery. Turn on ignition switch and low beam headlamps for Fog Lamps, or high beam headlamps for Driving Lamps. Activate auxiliary lamp switch. If lamps do not illuminate, check fuses and all wiring connections.
Use wire ties to secure any slack portion of the 12 volt connection or wire harness in the engine compartment away from moving parts or excessive heat.
FOR XENON LAMPS YOU ARE REQUIRED TO FIT THE GREEN WIRE TO THE MAIN BEAM.
IF YOUR LAMPS FAIL TO LIGHT UP THEN CHECK THE EARTHING - PARTICULARLY IF YOU HAVE POWDER COATED ITEMS IN THE SET UP.
INSTRUCTIONS FOR R55 R56 R57 R58 R59
(BMW MINI NOV 2006 + R55 CLUBMAN, COUPE, R56 MINI. R57 CABRIO)
DISCONNECT BATTERY. REMOVAL OF GRILLE & FITTING BRACKETS
Spot Light Kits should always be fit by qualified mechanics / vehicle electricians
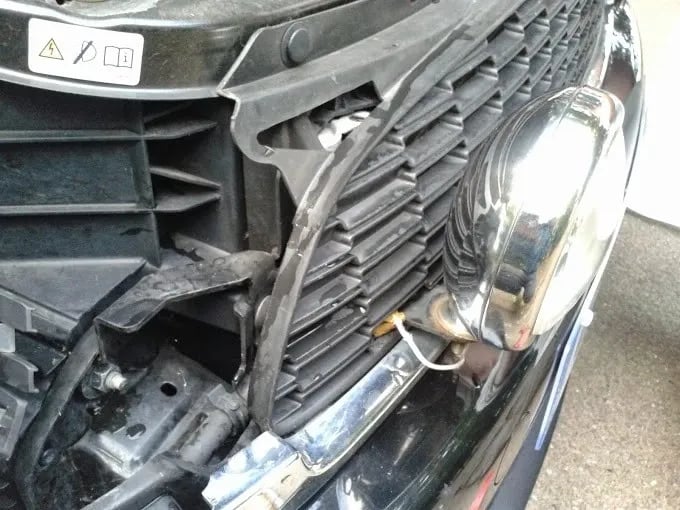
: PULL OFF LOWER CHROME TRIM SLOWLY. PREY OUT THE FOUR TOP CLIPS LOCATED ON THE GRILL. AFTER THESE ARE REMOVED SQUEEZE EACH OF THE FOUR LOWER CLIPS AND GENTLY PULL THE GRILL STRAIGHT OUT.
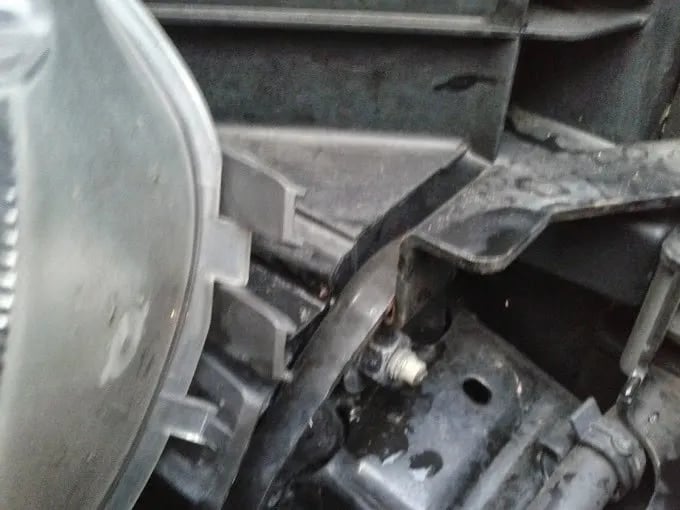
: INSTALL THE BLACK LIGHT BRACKETS USING THE FACTORY BOLTS. WHEN FITTING THE BRACKET THE ‘N’ SHAPED PART MUST FACE UPWARDS. (BRACKET FITS TO BUMPER BAR NUT AND TORX SCREW FROM FRONT PANEL).
INSTRUCTIONS TO TRIM GRILL
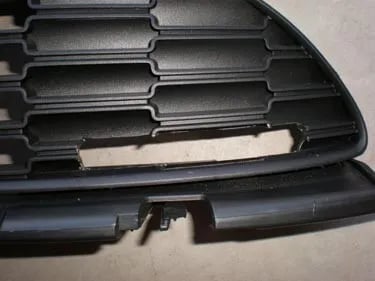
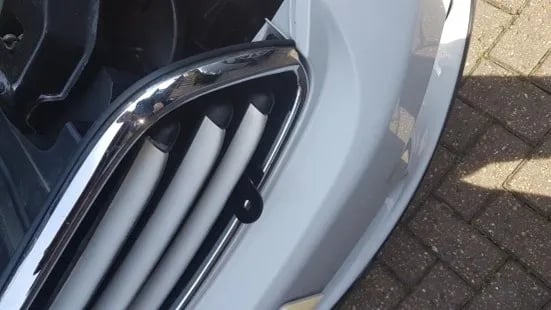
: USE THE PICTURE GUIDE TO TRIM THE OPENING ON THE FRONT OF THE GRILL.
: COOPER S/ ON BOTH THE LEFT AND RIGHT SIDE OF THE BACK OF THE GRILL YOU MUST TRIM THE FLAPS.
: COOPER / REMOVE THE LOWER CHROME TRIM AND CUT BACK THE BLACK PLASTIC – THEN REINSTALL THE TRIM SO THAT THEY CLEAR THE BRACKETS.
Please note this next section is not always required. - Depending on the height of your bumper, you may have to trim the threaded tube on the bottom or the lamps by about .50 inch or 12mm (to clear the bumper top once they are installed).
The best way to trim the posts would be to install a threaded nut on the post then carefully cut the post with a hack saw or dremal tool. Remove the nut to restore the threads.
RECONNECT BATTERY – If lights fail check the earthing of your spot lamps, particularly if there are powder coated items in your set up.
FOR MINIS WITH CHROME SLATTED GRILLE
To feed the bracket through the chrome slatted grille you will need to cut away most of the black plastic material near the bottom slat (corners) – you will see where this is as it lines up with the other trimmed grille allowing the brackets to pass through both.



R60 COUNTRYMAN
R61 PACEMAN
FITTING INSTRUCTIONS
R60 R61
BMW MINI COUNTRYMAN / PACEMAN
FITTING INSTRUCTIONS 2 OUTER SPOT LIGHTS
(Requires minimal grille trimming).
Spot Light Kits should always be fitted by qualified mechanics / vehicle electricians
Disconnect Battery.
Remove the grille via the 2x 8mm bolts / 2x 10nn bolts. Pushing the tabs sideways at the bottom of the grille will remove it.
Fitting the brackets...
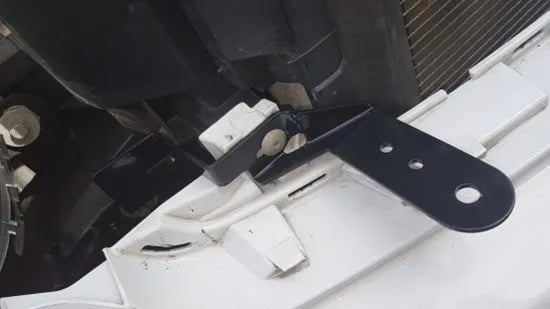
The n shaped part of the bracket must face upwards – remove one 16mm bumper bar nut and Torx screw from the front panel.
Fit the bracket (n shape up) and refit the bumper bar nut and torx screw.
Repeat the procedure on the other side.
Trim the grille (see picture of an earlier mini grille that has been trimmed to allow brackets through). Ensure you trim enough to allow the brackets to pass through.
Bolt your chosen spot lamps to the brackets
The pictures below are from an earlier model – your brackets fit in the same way but the grille may be a slightly different pattern.
RECONNECT BATTERY – If lights fail check the earthing of your spot lamps particularly if you have powder coated fittings in the set up.g the tabs sideways at the bottom of the grille will remove it.



BMW Accessories
Explore Wipac spot lights and driving lights for your BMW.


BMW Accessories Hub
Explore our range of Wipac lights, BMW accessories, and MOT compliant certificates for your vehicle.


Advanced Lighting Solutions
Discover high-quality BMW Mini spot and driving lights for safe driving experiences.
Quality Compliance Certificates
Ensure your vehicle meets European road legal standards with our MOT compliant certificates.
Premium BMW Accessories
Find top-notch accessories to enhance your BMW’s performance and style today.
